|
Author:
tantric |
|
Intro: |
|
Stock
PSU's that came bundled with our cases look plain and dull
compared to it's Enermax and HEC variants which sports,
with dual fans, wire sleeving's, chrome grills etc. In this
guide we'll try to spice up that dull and boring look. |
|

|
|
The
victim a stock 300w PSU duh... : (
|
|
|
|
Mods
and Materials |
|
The
mods consist of the ff: installing a blowhole on the top cover
to improve airflow, removing the metal grill on the rear
blowhole, replace the stock fan with clear fans, painting the
chassis and tidying up the wiring using
translucent spiral wraps.
Materials Needed:
-Pliers
-Wire Cutter
-Heat Shrink Tubing
-Soldering Iron
-Soldering Leads
-Spiral Wraps
-2pcs 80mm Clear Fans
-Chrome Fan Grill
-Translucent Spiral Wraps
-Fan Screws
-Dremel, Jigsaw or Holesaw
-Hand Drill & 4mm drill bit
-Sandpaper & Files
-Masking Tape
-Canned Spray Paint & Primer |
|
|
|
DISCLAIMER:
Proper precautions should be taken when attempting your
own case mod project and as with all warnings, you are
responsible for your own actions. Always wear proper
safety equipment when handling power tools. With that
said, on with the modz. |
|
|
|
1.
Start by removing the top cover of the PSU. note** make
sure to discharge the PSU before opening it up, I let it
rest for 3-5 days before opening it up as with any
electrical equipment it still may contain deadly
electrical charges.
2. After removing the top cover we'll need to draw the
template for the 80mm blowhole. I used the chrome grill as
template, after drawing out the template now comes the fun
part cutting |
|

|
|
3.
Time to take out the dremel... |
 |
|
3. Start by drilling out the
four screw holes for the fan using the drill & 4mm
drill bit. |
|

|
|
4.
After drilling out the screw holes. Fire up the dremel,
start cutting small incision cuts using medium
setting then gradually increase speed as the cutting disc
get deeper into the cut. Do not force the cutting disc
into the cut, as you'll wear out the disc easily. |
|

|
|
5.
After a few more minutes of cutting, here's how it turned
out. |
|

|
|
6.
Use a round edge file and sandpaper to de-burr the rough
edges left by the dremel. Here's the finished blowhole
with clear 80mm fan installed and chrome fan grills. |
|

|
|
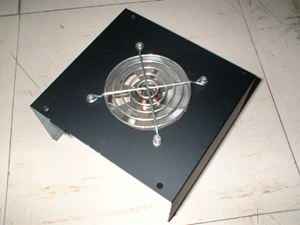
7. After a
light coat of primer and two coats of Bosny Flat Black
spray paint, here's the completed PSU cover and newly
installed Clear Fan |
 |
|
Conclusion:
This
completes the first part of our PSU modding guide, please
check back later for the second part of this guide. Happy
Modding... : ) |